
Filerun 是一款 php 编写的文件管理和文件共享程序,其风格与 Google Drive 非常相似,官方有演示站, 点此查看。 Filerun 分为常规版和企业版两个版本,常规版为免费版本,最多允许建立三个用户;企业版为收费版本,不限制用户数量。 点此查看两个版本的详细对比。如果是个人使用,推荐常规版本,其功能完全满足个人使用需求。本文详细介绍如何在Ubuntu 18.04上手动搭建 Filerun。注意,以下步骤基于 LNMP ,如果服务器未安装 LNMP ,请参考文章“ Ubuntu 18.04 手动搭建LNMP环境”配置服务器环境。以下操作是在 root 账号下进行的,非 root 账号需提升到 root 权限。
安装php7.2扩展
yum install php72w-mysql
yum install php72w-mbstring
yum install php72w-opcache
yun install ImageMagick
如果 ImageMagick安装出错,可以源码安装:
yum install php-devel php72w-devel
wget https://pecl.php.net/get/imagick-3.4.4.tgz
cd imagick-3.4.4
phpize
./configure --with-php-config=/usr/bin/php-config
make && make install
systemctl restart php-fpm
创建数据库
使用如下命令为 Filerun 建立数据库, your_password 需改为自己的密码:
mysql -u root -p
create database filerun;  #创建名为filerun的数据库
create user 'filerun'@'localhost' identified by 'your_password';  #创建一个用户名为 filerun ,密码为 your_password 的用户
grant all privileges on filerun.* to 'filerun'@'localhost' identified by 'your_password';  #授予访问权限
flush privileges;  #刷新权限
quit
通过以上步骤,Filerun 的数据库便建立好了,数据库用户名为filerun,密码为your_password。
配置 PHP
Filerun 未开源,软件的运行需要 ionCube 扩展的支持,服务器在搭建 LNMP 环境时需安装 ionCube 扩展。 ionCube 扩展的安装方法:
wget https://downloads.ioncube.com/loader_downloads/ioncube_loaders_lin_x86-64.zip && unzip ioncube_loaders_lin_x86-64.zip
cd ioncube
php -i | grep extension_dir #查看php扩展目录
cp ioncube_loader_lin_7.2.so /usr/lib64/php/modules
systemctl restart php-fpm
修改etc/php.ini,增加以下内容
extension_dir = /usr/lib64/php/modules
;zend_extension = /usr/lib64/php/modules/ioncube_loader_lin_7.2.so
复制以下代码并执行,以添加 php 配置:
expose_php              = Off
error_reporting         = E_ALL & ~E_NOTICE
display_errors          = Off
display_startup_errors  = Off
log_errors              = On
error_log                = /var/log/php_errors.log
ignore_repeated_errors  = Off

allow_url_fopen         = On
allow_url_include       = Off
variables_order         = "GPCS"
allow_webdav_methods    = On
memory_limit            = 128M
max_execution_time      = 300
output_buffering        = Off
output_handler          = ""
zlib.output_compression = Off
zlib.output_handler     = ""
safe_mode               = Off
register_globals        = Off
magic_quotes_gpc        = Off

file_uploads            = On
upload_max_filesize     = 1024M
post_max_size           = 1024M

enable_dl               = Off
disable_functions       = ""
disable_classes         = ""
session.save_handler     = files
session.use_cookies      = 1
session.use_only_cookies = 1
session.auto_start       = 0
session.cookie_lifetime  = 0
session.cookie_httponly  = 1
session.save_path = "/var/lib/php/sessions"

opcache.enable=1
opcache.enable_cli=1
opcache.interned_strings_buffer=8
opcache.max_accelerated_files=10000
opcache.memory_consumption=128
opcache.save_comments=1
opcache.revalidate_freq=1

date.timezone            = "PRC"

zend_extension = /usr/lib64/php/modules/ioncube_loader_lin_7.2.so
修改/var/lib/php/sessions的权限
chown nginx:nginx -Rf /var/lib/php/session/*
chown root:nginx /var/lib/php/session/*
重启 php7.1-fpm:
systemctl restart php-fpm
安装 FileRun
下载源码
创建 Filerun 主机目录:
cd /var/www && mkdir filerun && cd filerun
安装 unzip ,用于解压源码:
yum install unzip -y
下载并解压源码:
wget -c "http://www.filerun.com/download-latest" -O filerun.zip && unzip filerun.zip && rm filerun.zip
或者不解压,下载unzip.php,然后在web页解压。官方推荐web页解压
wget -O FileRun.zip http://www.filerun.com/download-latest
wget -O unzip.php http://f.afian.se/wl/\?id\=HS\&filename\=unzip.php\&forceSave\=1
创建 nginx 配置
vim /etc/nginx/config.d/xxx.xxx.conf
内容如下:
server {
    listen       443 ssl http2 ;
    server_name  example.com; #这里写主机域名
    root         /var/www/filerun; #这里是路径
    index        index.php;

    ssl_certificate "/etc/letsencrypt/live/xxx/fullchain.pem";#证书地址
    ssl_certificate_key "/etc/letsencrypt/live/xxx/privkey.pem";

    include /etc/letsencrypt/options-ssl-nginx.conf;#这里包含了页面加密信息,比如tls
    ssl_dhparam /etc/letsencrypt/ssl-dhparams.pem;

    # Load configuration files for the default server block.
    include /etc/nginx/default.d/*.conf;

    location ~ [^/]\.php(/|$) {
        # 设置监听端口
        fastcgi_pass   127.0.0.1:9000;
        #或者可以用servers
        #fastcgi_pass unix:/var/run/php/php7.2-fpm.sock;

        fastcgi_split_path_info ^(.+?\.php)(/.*)$;
        if (!-f $document_root$fastcgi_script_name) {
            return 404;
        }
        # 设置nginx的默认首页文件(上面已经设置过了,可以删除)
        fastcgi_index  index.php;
        # 设置脚本文件请求的路径
        fastcgi_param  SCRIPT_FILENAME  $document_root$fastcgi_script_name;
        # 引入fastcgi的配置文件
        include        fastcgi_params;
    }

    error_page 404 /404.html;
        location = /40x.html {
    }

    error_page 500 502 503 504 /50x.html;
        location = /50x.html {
    }
}
更改主机目录所有权并重载 nginx :
chown -R nginx /var/www/filerun
systemctl reload nginx.service
安装 filerun
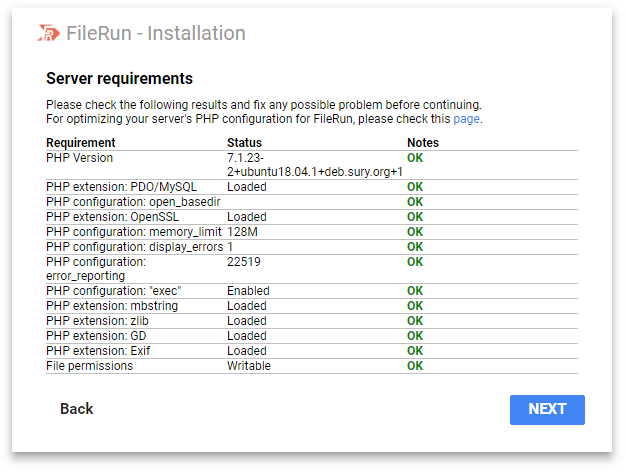
浏览器访问 example.com ,程序首先会检查服务器环境,状态都 ok 的情况下点击 NEXT 按钮进行下一步。
 填入文章开头设置的数据库信息,点击 NEXT 按钮进行下一步,完成 Filerun 的安装。
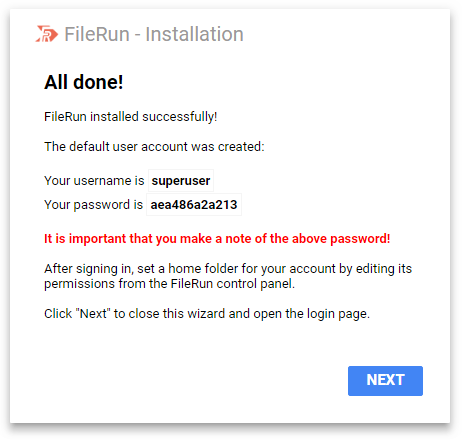
 复制安装完成后程序给出的用户名及密码,下一步登录 Filerun 要用到。
配置 Filerun
配置管理员账户
使用上一步程序给出的用户名和密码登录 Filerun ,根据提示修改超级管理员的密码。修改完密码后为管理员创建工作目录。使用如下命令创建工作目录(工作目录的路径可根据自己的需要修改):
mkdir /home/filerun
cd /home/filerun
mkdir superuser
chown -R nginx:nginx /home/filerun
/home/filerun/superuser即为管理员工作目录,将其填入到 Control Panel-Admin-Users-Permissions 下的 Path 栏,点击 Save changes 按钮保存即可。
启用文件缩略图预览
文件缩略图依赖 imagemagick、pngquant、ffmpeg 等软件包,使用如下命令安装之:
apt install imagemagick pngquant ffmpeg -y
Filerun 后续更新版本提供了 LibreOffice 功能支持,使用如下命令安装 LibreOffice 扩展:
apt install libreoffice -y
安装完成后进入控制面板的 Image Preview ,启用图片、视频以及文档预览,点击 Save changes 按钮保存,如下图所示:

如需更多设置,请参考官方文档,文档地址:
http://docs.filerun.com
注意,在正式的生产环境下建议将display_errors = On修改为display_errors = Off,以确保网站安全。通过以下命令修改,重启 php-fpm 即可:
sed -i 's/display_errors          = On/display_errors          = Off/' /etc/php/7.2/fpm/conf.d/01_filerun.ini
systemctl restart php-fpm.service
通过以上步骤便可在 Ubuntu 18.04 LNMP 环境下手动安装 Filerun ,本文结束。